Sunday, November 18, 2012

Rolled Paper Christmas Tree Wall Hanging

Again, Pinterest is my inspiration!  I found this pin - and found that the page it referred to was no longer available.  I wasn't having luck searching the blog either - so I decided to broaden my search.  I found this blog and some directions.

I gathered materials - I had a few pages left in a holiday themed pad of cardstock from a craft last year (another tree project!! I think I have a problem!), an extra canvas and of course I have a glue gun and glue sticks.  I pulled out my cutting mat and my paper cutter, a pen and some scotch tape.

First I sorted papers into red, blues, green and multi colored piles.  I wanted to be sure to mix up all the papers and colors.  I cut them into 6" strips.
I started at the bottom, cutting them into 12", 11", 10" etc.  I was following the directions from the blog, and getting them started.
I rolled the paper strip (12x6) around a marker.  The cardstock, especially with the glitter, was hard to roll.
I used a small piece of scotch tape at both ends, and on the longer strips in the center.  I kept rolling until they were all finished.  I realized that the canvas I had in the closet was much larger than the one the blogger originally used - so I cut more paper in 1/2 inch increments (11.5, 10.5, 9.5, etc).   
Next it was time to figure out placement.  This canvas is 18x24, so 9" across was the middle and I marked it at the top and bottom.   The rolled paper tree was 18" tall, so that left 6" not used in the height....so I started 3" from the top and 3" from the bottom.  
I glued the bottom roll on first, and then using plenty of hot glue I added each one on above the others.  Looking back, these were a little crooked...I probably would mark them before gluing them on next time!
Lots and lots of glue, make sure they are secure!
Keep gluing!!  Almost there!  I wish I had a heavy-duty glue gun!
The last thing I did was to cut two pieces of brown cardstock and roll it.  I glued these onto the bottom of the tree for the stump!
I've already found the PERFECT place to hang this - right behind my small WVU Christmas tree above my crafting buffet (in a normal dining room, this would be a beautiful buffet to hold dishes....in my world, this is my craft space!)   
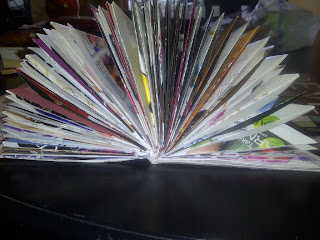
Magazine Christmas Tree

I found a ton of Christmas tree ideas on Pinterest this weekend.  With the air cooling off, Thanksgiving coming quickly, it is time to start Christmas crafting!

One idea stuck in my mind - this pin and the blog it links to refer to a young lady creating this for a school project!  This is definitely something that the kids can do and a great way to reuse those old magazines.

First, get an old magazine - after I tear out (or scan) the workouts and recipes I want to keep.   Start at page one and first fold over RIGHT to the crease, the neater these folds are, the better and more even the tree will look.  Fold the crease down firmly.

Next, fold over again to the binding.   Fold the crease down firmly again.  Be cautious with this fold - it is easy to tear at the top (this is thin paper!) and if it tears it will cause a portion to stick out of the top of the tree.  I tore more than a few!   
 Finally, fold up the bottom. 
That is one page done.  Keep folding EVERY page like this.   I folded the thicker ad pages, the perfume pages and everything in between.  This was a Glamour magazine and had about 150 pages!   But it made for a nice full tree.  I don't think my Sports Illustrateds would look the same!
Here is a few folded!  Lots to go!
Getting closer!
Whew!  All folded!  Now it is time to tear off the covers gently.   I suppose you can cut these, but I just tore.  Be careful to not tear off the actual part that is holding the binding together.  
See how the actual "spine" is still left on the binding?   
Make sure not to tear it off like this.  
Oops!   The pages will start to come apart if you take the spine off. 
Finally, I used some scrapbook adhesive to attach the front few pages to the back few pages.   This made a nice round, full Christmas Tree!  


Saturday, November 17, 2012

Nut Butter Bread

So I have not had grain in my regular diet since February. I eat following the Paleo diet and enjoy it most of the time. Lately I had been craving the comforts of some of the foods I used to eat a lot - mostly bread!

There is something about fall, apple butter and pumpkin butter on fresh bread. A slice of pumpkin spiced French toast. And toasted or grilled sandwiches.

I know that grain doesn't agree with my system and I know that over processed foods like some of the "gluten free" varieties have so many chemicals and overly processed ingredients that I didn't want to try those even.

So I started my search. The paleo community is torn on bread substitutes...most feel that it is a slippery slope of finding ways to cheat that technically meet the nutritional values of Paleo.

I think for me, finding something that is the Paleo unprocessed substitute for something I know isn't good for me is a better alternative than "cheating" and eating the traditional SAD (Standard American Diet) version.

So here it is.

http://cookingcaveman.tumblr.com/post/25506028957/the-paleo-bread-search-is-officially-over
I made this nut bread this afternoon. It turned out fairly flat and un-risen for me, I think this is because my baking soda was pretty old. It tastes good and holds together well.

I wish I could take credit for the recipe. But I made it just as Cooking Caveman suggested. I can't wait to make the next loaf with macadamia nut butter! Maybe add some coconut too!


Sunday, November 11, 2012

Race Bib Book

So my last post was all about the races I have completed. I included a picture of my bibs. I've saved them all. And even though I met my goal I'm going to continue to run. I ran a race this weekend in fact. I'm expecting this stack of bibs to grow and grow and grow.
 
And they are taking up a lot of space! I needed to do something with them so of course I googled for ideas. I found several ideas about making them into bags or Scanning them and printing on canvas to make them into a quilt and even making them into coasters. But all of those projects required the bibs to be sent away or made a product that I really don't have a need for. The best idea was something I saw in the back of Runners World magazine called a bibfolio, But this cool album to keep track of all my bibs was almost $40! I knew I could do better than that.


Unfortunately I didn't take many in process pictures. I think I was just too excited to create and just kept working without snapping some photos.

First I decided on the size of my cover I measured the largest bib I had. In this case it was the color run and the GOTR Spring 5K. And then I made my cover and back bigger than those by about about an inch in all directions. This meant that my book will be a 9 x 9 square. I cut chipboard into two nine by nine squares. You can buy chipboard at a craft store, but I typically use chipboard that comes as a stabilizer in packages of pattern scrapbook paper. You might find these on the back of a stack of coordinated paper or in a package of lettering. You want to make sure that you use chipboard and not corrugated cardboard.

Next you'll cover this with patterned paper. The best way to cover is to glue the chipboard in the center of your square of paper. Then cut triangles off of each of the corners. This gives a nice mitered finish on the inside corners of the board you're covering. I also cut a square just a shade bigger than 8 3/4 inches and glued this over the folded in edges to make everything look professional.

I use my Cropodile to punch holes in the front and back cover at the same width as the holes in my tops of my bibs. The cropodile really is the best hole puncher I've found because it lets you punch further away from the edge than a traditional hole punch and it easily punches through chipboard and multiple layers of paper.

 
I threaded the front and back cover and all of my bibs arranged chronologically from the first race in the back to the last race on the top onto 3 inch binder rings that you can purchase at craft stores or office Supply stores.

Last step is to embellish. I used letters and rub ons and stickers to decorate the front. I cut four rectangles of a coordinating color of patterned paper to make special places on the inside cover for my PRs or personal records. (I saw a great idea online to use white address labels to record your PRs. This way when you break a record, you can just place a new label over the top.)

 
And the best part of this bib folio? I used all crafting supplies that I already owned! I did not spend a single dime to buy something new to create this bib folio.


Monday, November 5, 2012

A Baby Shower Gift: Onesie Cupcakes

Today I had a baby shower for three awesome friends who are expecting new little ones in their lives. I found an awesome idea on Pinterest, of course, and I just had to try it out. This is a great alternative to a diaper cake, and a very cute way to present a simple gift.

Here is my inspiration: http://www.ourlittlecasita.com/2011/08/diy-cupcake-onesies-tutorial.html. This blog has great easy-to-follow instructions however I decided to skip a few steps and see if I could make it even easier

Since I was making three sets of four cupcake onesie packages I bought 12 onesies. I didn't want to use jumbo cupcake wrappers so I made sure to buy only newborn onesies.

First I took off all the tags so everything would fold up and rolled easily. Next I folded Each onesie into thirds and then that long skinny strip of onesie in half again. Starting at the end by the sleeves roll it tightly into a spiral, pulling the center up slightly to make the cupcake shape.

This is where I had to play around a little bit. Some of the onesies were made of thicker material. They didn't roll nearly as nicely as the super-thin Gerber onesies. I had to roll and reroll a couple of these until I got them just right! I skipped the step about the rubber band. It may have been easier I just tied it with a length of coordinated color ribbon around the spiral. Place it gently in the cupcake wrapper and you're done!

The next step is to find a cupcake box. I found mine at Michael's, a great craft store. You can find these in the cake decorating aisle near the cupcake wrappers. I was really surprised at all the patterns and coordinating cupcake wrappers that were available. The boxes hold for cupcakes each and are in packages of three so it was perfect for my shower gifts today. I added a tiny green adhesive rosette to the top of each cupcake. These were from the scrapbooking aisle. Tie each box with a coordinating color ribbon and ta-da! They're done!

Don't forget to pay attention to whether your friends are having boys or girls. Two of our friends haven't found out yet so they have green and yellow onesies and ribbon. Another friend already know she's having a girl so of course I chose to use lots of pink!

Sunday, November 4, 2012

I did it - 12 5Ks in 2012

I know this is my crafty space....but tonight I need to write about what I've accomplished.  I met a goal I set for myself and I am so proud, I need to share!

This morning I did the hardest and craziest 5k I have ever done.  I finished the Blood and Guts 5K at a local Paintball park.   This was a nutty 5K and obstacle course - logs to crawl under and over, an army crawl in pumpkin guts, a climbing wall, several times back and forth across a creek on rocks and boards and even a "blood and guts pit!"   All while being chased, scared and attacked by Zombies and Monsters (they launched foam balls and bats at us!)


The fact that I did this, that I made it means so much to me... I never thought I'd be able to do this!  BUT even more important, this was my 12th 5K of the year.  I set a goal, back in February to get moving and do 12 5Ks in the year 2012.

I started out just walking these races.   I was slow, but I was moving.

I slowly started running some, then walking, then running more.   And this is how I finished my races.  I run and run and run now and I love it!  Sometimes I have to stop to walk and it's ok, then I run again after the next little bit.  But I am doing them.

And today, I finished my 12th.   I completed my goal.  I started on the 24th of March and finished today, November 4th.   That is 37.2 miles raced in 32 weeks , or the equivalent of 8 months.  I not only met that goal but I blew my goal out of the water!!

  • March 24 - Rev 3 Run Rogue 5K at Fairfax Corner
  • March 25 - RMH 5K in Ashburn
  • April  15 Strides for Success 5K at Fairfax Corner
  • May 5 Run for Kids 5K in Leesburg
  • May 20 - GOTR 5k at GMU 
  • June 9 - Buzzing for a cure 5k in Herndon
  • September 23 - Asha Jyothi 5k at Fairfax Corner
  • September 30 - Cody's Crew 5K in Manassas
  • October 6 - Soles for Hope in Chantilly
  • October 20 - Color Run at National Harbor, MD
  • October 27 - Goblin Gallop at Fairfax Corner
  • November 4 - Blood and Guts 5K in Aldie 

And today, I am proud.   I am so much stronger - and so much healthier.  And I needed to write about it!!  Thanks for reading!