Monday, January 30, 2012

Photo - A - Day (PAD) part 2!

So early in January I posted about Photo-A-Day and how I was hoping to grow and change as I took one photo per day for all of 2012.  Click here to read more!

I wasn't sure how I would organize them and display them after I was done.   I have figured out what is working for me!

First - Shuttercal.   I love that it shows me a calendar of the month, with a thumbnail of my photos, making it very obvious which days are missing. It helps me keep on track - I don't want to see that blank square staring up at me!  Shuttercal membership is free - but if you upgrade to the next level you have the ability to set your account to private.   This is important to me and I chose to pay $19 for the yearly membership to be able to control more of the settings (especially privacy) for my account. Because I have my account set to private, I've included a screen shot of my calendar rather than a link. 


Secondly - StudioJ.   Studio J is the studio (digital) scrapbooking tool from Close to my Heart.  I have used StudioJ for the last year and a half, but in the last 4 months I have started to complete most of my scrapbook pages digitally rather than traditionally.  Studio J has many options for paper (kits) and for patterns that use 7 photos in a 2 page layout.  I will be completing a 2 page layout each week.   Right now, we are on the start of week 5...and I have successfully finished taking all 28 photos for each day so far this month AND completed the first 4 weeks of layouts.  They are in my cart ready to order!   :)  Since I haven't ordered them yet, I don't have a finished product to share, but here is a screen shot of my week 4 layout in progress:


Studio J has a membership as well - but it is optional.   If you do purchase a membership, there are more kits and patterns available to you.   The layouts that you purchase are reduced by 50% and each month one order of 5 layouts or more is shipped free.   Studio J has an option to order just the JPG files of your layouts, allowing you to print them to Costco or another store.
Sunday, January 29, 2012

Scrapbook Weekend

In January I attended a weekend long scrapbook retreat in Shepherdstown, WV.    This is the third or fourth time I have attended and this truly is one of the best retreats I have participated in.

Creative Crops is the company that puts this on - they usually hold 2 retreats a year, one in April and one in January and sometimes one in the fall.   The next one (April) is open for registration now.  :)


I love these weekends for a couple of reasons.
  • I go with a great bunch of ladies and we have a blast.  It is fun to be away from all the cares of the world and to be around such fun girlfriends.    
  • Everything is available at the hotel - we stay there, we scrapbook there, we have vendors there, we have access to manicures/pedicures/massages, the restaurant is where we eat and the bar is close.   The bartenders even come into the scrap room and take orders each night.   
  • There are opportunities to get rid of stuff you don't use - both a "yard sale" table to see goods and a "freebie" table.   There are so many people at this event that someone wants what you don't!
  • Plus there are contests and competitions - and I LOVE to win!  

I find that I am incredibly productive on these weekends - I get caught up on scrapbooking, usually get a few craft projects or mini-books done.

  Check out all of our stuff!   We had 7 in our group and were all at one table.
 A delicious drink I got from the bar at the hotel - Mmmmm!  Snowdrift!

The only drawback is packing up my stuff and figuring out what I need to take to finish my projects.  I've had a couple of really successful weekends and those always seem to be when I plan well ahead of time.   However, this time I brought more stuff, not well packed and had most of what I needed anyway.   I have been working hard to clear out stuff that I don't use so I have less to decide to bring or not.   

I did enter the layout contest this weekend - and won a massage!
This is the layout that won.  What do you think?


I finished 19 pages for my sister's album, 4 pages for my mom's book, a mini-book for my parents, a banner for my office door, 8 pages for my book and cleaned out much of my stuff.  
Here is a look at some of the projects I completed.


Arranging Flowers


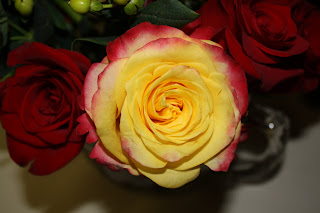
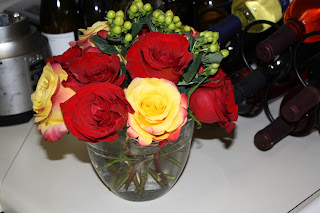
Will came home on Thursday with the most beautiful roses.  They had such full blooms and so many stems of them, that they wouldn't fit in the go-to vases that I have.  Most of those had too narrow of a neck to accommodate these fabulous guys.  Look how full!

So I decided to try something I had seen on Pinterest and get crafty!

First, I found a bowl with a wide mouth.  For this I chose a Pampered Chef Batter Bowl.  I like the idea of a really basic, every day bowl being used for something so pretty!  

Next I took plain old scotch tape (because I didn't have any floral tape and I liked the idea of it being clear) and created a criss-cross pattern across the top.   The tape was regular width of scotch tape, so I can see how narrow floral tape would work better - but it is dark green!  I really like the idea of not being able to see the grid.   I also forgot to take a really good picture of this, but you can see it in the one below if you look for it.
Finally, tuck each of the flowers into the holes of the grid you have created.   Enjoy your arrangement!  Beautiful and easy.  The whole thing took me about 15 minutes.   A couple of other tips - remember to pull the leaves off your stems.  If your leaves are below the water level, you will get rot... and that's gross.    Cut your stems under running water - this opens up the stems so they are open to taking up water from the vase/bowl that you use and they will stay fresh and beautiful as long as possible!


Sunday, January 15, 2012

Photo - A - Day (PAD)

Completing a Photo-A-Day, also known as Project 365, is a huge goal of mine for the year 2012.   The idea behind it is incredibly simple:  each day, snap one photo about something in your day.

I've admired many of the scrapbook bloggers out there who have done this, who have done a Project Life album for a year, envied many of the final products, and wished for the dedication to a project like this.

Here is a great explanation of this project and some of the outcomes that are possible from completing this project:

and this is an amazing story of a man who took this very seriously.  He began in 1979, and for 18 years he took one photo a day until the day he died in 1997.
Simply googling Photo a Day or Project 365 gives many ideas of what people are doing... And there are lots of websites such as Shuttercal (arranges your photos that are uploaded daily into a calendar) and 365project.org which keeps track of all the daily images that are uploaded.

What do I want to get out of this project?
  • Document my year - what have I accomplished?  What has changed as the year went on?
  • Identify what I am focused on this year - are my priorities straight?  What do I spend my time on?  Do I need to make changes?
  • Improve my photography - in addition to using my cameras and phone more, I want to use them better.  I want to learn what they can do and how to make it happen!
  • Be more comfortable with my camera - and take a class or two this year!
Below are a few pictures from my project so far.  I have been using my camera and my blackberry to capture images through the day, whichever I have on hand.   I haven't decided if I will use Shuttercal or how I will collect them and share them.  Right now they are all in a folder on my computer, each photo labeled with the date.  

Is anyone else doing something like this?  How will you share?  What do you hope to get out of it?

Jan  5 - are we taller than an emperor penguin?
 Jan 6 - undecorating the  Christmas tree!
 Jan 7 - fighting a cold
 Jan 8 - Photos taken for blog postings
 Jan 9 - first snow!
 Jan 10 - organized and ready!
 Jan 11 - new nail polish


Sunday, January 8, 2012

52 Things I Love About You - Mini Book

Have someone in your life that you love to pieces?  Here is a little mini book made from a deck of cards (hence, the 52 things).  This again was an idea I saw all over the place on Pinterest.   Super easy, only a little bit tedious and lovely to spend the time deciding on the 52 things...  This would be a great anniversary or birthday gift too!  :)


So first, find a cheap deck of cards.   The Dollar Tree has these, $1 for 2 decks.

Materials:
Patterned paper
Crop-a-dile or other whole punch
adhesive
ribbon
deck of cards

First, I covered all the cards with patterned paper.  I decided to cover the front sides since this was a cheap deck.  I've seen it done where the deck is from someplace special you went as a couple, so in that case you'd want the front of the cards to show.  Measure your cards, cut all the paper and then adhere it for the best efficiency.  :)

Secondly, I punched holes.  I think it is easiest to punch the wholes with the crop-a-dile because I could set my depth and know the wholes would be in the same place.  Remember, cover the cards first if you are going to do that so you don't have to punch twice!   I was able to punch about 8 cards at a time, using one as a guide.

Next, write your reasons - Some of the pages had a plainer pattern that I just wrote right on.  Others needed a tag.  If you left your front sides uncovered, you may just want to add a tag to the back sides (numbered or face cards) to add your reasons.   Also, be purposeful about whether your pages will be portrait or landscape and try to stick to it so your love doesn't have to flip his or her head around to read it! 

Finally, thread the ribbon through.  I threaded up from the bottom in both holes, and tied a bow on top.  Don't forget a tag on the back with the date or occasion on it so you will remember years from now when this was created!