Monday, October 29, 2012

Waiting for Sandy, the SuperStorm....and a tShirt Quilt

Ok, so this big giant superstorm is headed our way.  Sandy has cancelled school for 2 days and disrupted everything.   Right now we have high winds and lots of rain.  We are expecting flooding soon.... Thankfully I don't have a basement!

So I decided this was the perfect time to start a LONG project.   Last time I made a tshirt quilt it took for-EVER!   This time, I am either much better at it, or less distracted because I am rocking this quilt thing!

And this is also an in-process blog post.   No finished project yet -but hopefully (if the power stays on!) I will have something great to share soon!

I have committed to running 12 5Ks in 2012.   In my quest to get healthy and strong, this is just one goal I have set....and I am about to reach it.   :)   I have 11 races done and one more in November.

Now, all these races (but one!  GRR!!) have given me a tshirt of some sort.   SO this is where my 12 shirts are coming from.

First, I cut the shirts apart - sleeves off, sliced the sides and the shoulders.

Next, I bought value packs of iron on interfacing (get a light weight one) and cut it into 12" squares.  I ironed this onto the insides of the shirts.

Then I cut them into about 13x13 squares (so I have seam allowances this time!)

Next is the most fun - laying out the design!   Most of the shirts have a back-side with their sponsors.  I can't decide if I'm going to use them in the quilt front and make it huge OR make the back quilted from the backs of the shirts.    Right now they are laid out separately on my living room and dining room floor:


Now - I have one more race to run AND one race that didn't give a shirt.  I'm going to take a pic of the "plastic cup" we got instead of a tshirt.   That is why there are two spots left.   I wish there was a way to put my race bibs in the quilt without it being too much...   I thought about scanning them and printing them on iron-ons.   Hmm... Maybe this will be what I do next!

Last time i made a quilt like this it was a Queen Size quilt with my college, camp and sorority tshirts in it.  It took me forever!  This time I am going much faster!  I used a Fiskars Rotary Cutter and it is beyond amazing.  Everything is cut straight and so quickly!!

AND I have all these beautiful tshirt scraps left - so I googled projects with tshirt quilts and found this.  SOOO easy!  I made two wide headbands and one thin so far.  I anticipate making more because they are so super easy and fun!


Saturday, October 27, 2012

Apple Cider Pork Roast in the Crock Pot

A few weeks ago, I had dinner at Cracker Barrel and saw their Apple Cider Braised Pork - delicious! But I knew I had to try and make it healthier, because let's face it....who knows what kinds of sweetener and preservatives are used and how much salt is added in when we eat out

Today I headed to Target and Costco - in the middle of all the crazy storm preparations here in Northern Virginia. Most people were buying tons of water and toilet paper, bread and milk. I did buy some bottled water just in case....but no TP, bread or milk in my basket!

For this recipe, I picked up a 4 pack of pork roasts, a bag of gala apples, dried cranberries, chopped pecans, and a half gallon of apple cider.

I browned the pork in a skillet, just to get the brown bits in the pan and on the meat. I added a tsp of coconut oil to the pan to speed things along.

(Side note: this white enamel skillet from Pampered Chef is amazing. I've completely been converted to using this and no other! I cook eggs, meat, veggies, of course bacon, and nothing sticks. It is so easy to clean up too! And pretty too!)

Then I chopped up my apples, peels on, and added them to the crockpot on high. I added about a half of the bag of cranberries and a third of the bag of pecans to the crockpot.

Next, I transferred the browned pork into the post and added a half jug of apple cider. I used a little of that to deglaze the pan and get all that yummy browned pork out of the skillet.

Now, all this is cooking on high for a few hours and it smells DELICIOUS! I can hardly wait till it is done. I'm guessing about 3-4 hours, but I will rely on my meat thermometer to tell me when the inside of the pork has reached 170 degrees and it is pull apart tender.

I'm normally very good at reading labels and avoiding additives like extra sugar. I missed the boat on these cranberries....they have sugar added. However, the chaos that is the stores here before the giant storm mean I just used them anyway instead of heading back out to exchange them. Always read carefully!


Monday, October 1, 2012

Oh my goodness! Pumpkin Pie Shake and Frappe!

Oh my goodness.


A few days ago I pinned a delicious looking drink recipe. I am ready for fall and that means I love all things pumpkin. It amazes me how businesses can develop anything and everything pumpkin.


Now, they are rarely healthy and certainly not Paleo.


But this? This recipe I can adjust and make it Paleo! I can do this. And I did. It is beyond amazing. I can't wait till morning to try the frappe recipe (if it wouldn't guarantee I am up all night I'd make it and drink it now!)


Ok....here it is.


http://www.peanutbutterandpeppers.com/2012/08/24/drink-your-pie/


That is the original and I only changed it slightly.

1 cup of coconut milk

2 Tbsps of canned pumpkin

1/2 tsp vanilla extract

1/4 tsp pumpkin pie spice

Handful of ice

Blend all ingredients in a blender or magic bullet. Top with a sprinkle of cinnamon and enjoy!


Saturday, September 22, 2012

Homemade Veggie Soup


Nothing says "First Day of Fall" like a slow cooker full of homemade soup.   Between the smells coming from my Scentsy (currently obsessed with Fried Ice Cream - order yours HERE!) and the soup cooking - and the sounds of football on TV, it was a perfect fall Saturday.

Now, to make this soup, I needed more veggies....I went to a local Asian Market - Lotte Plaza - and it was like a veggie jackpot.  Check this out!   I spent under $24.   And I splurged on a $4 bar of dark chocolate - so all the veggies and fruit was really under $20.

2 zucchini
2 yellow squash
2 green peppers
a bag of yellow, orange and red mini bell peppers
8 bananas
a pineapple
2 boxes of strawberries
5 peaches
a bag of carrots
a bunch of cilantro
and a box of artisan organic variety leaf lettuce.
PLUS that delicious bar of dark chocolate from Green&Black

Wow!  That is where I'm going from now on - but not on the weekend.  It was SOOO crowded!  I will go on weeknights.  I've gone a few times on school nights and it's not that bad.

So anyway, to make this veggie soup - add about 2 TBSP coconut oil and some seasonings to the bottom of your crockpot on high.   I used salt and pepper and oregano for this one.

Then start cleaning and cutting your veggies.  As much as I make fun of Rachel Ray, I like her idea of a garbage bowl - and it really works.  So cut your veggies, I cut up 2 yellow squash, 2 zucchini, 2 green peppers, a big handful of mini peppers, a bag of carrots.  


Add them to your crockpot.   My BF doesn't like onions, so we leave them out, but they are good in this too!  Fill up that crockpot!  They will cook down.


Add your tomatoes - you can use meat broth if you'd rather - but I like to make it vegetarian so I used 2 pints of tomato basil simmer sauce and 1 pint of stewed tomatoes.  The stewed tomatoes are a mix of red and yellow, so they are a light orange sauce.  :)   If you don't have home canned tomatoes to use a big can of chopped tomatoes or stewed tomatoes will be delicious too.  Also, you can add ro-tel to add a little heat!
Then, just let it cook.  YUM!   I will probably get some nitrate-free sausage to add to this tomorrow.  Probably something a little spicy...but I've eaten it as veggie soup many times!   Also, you can change your seasoning to chili seasoning to make this more like a veggie chili.  Also, browning a bunch of chopped up beef or ground beef first to add to the bottom of the crockpot is a great additive.

Enjoy!

Easy and Yummy Frittata

This morning I needed something easy and delicious and nutritious for breakfast.  I wanted to use up some leftover items that I used earlier in the week.  

An easy fritatta was the best choice!  An oh was it yummy!

I used 4 eggs (last of my big carton), about a half a bag of carrots, snowpeas and broccoli, a little handful of broccoli slaw, and a few oz of sharp cheddar cheese.  You could easily leave out the cheese if dairy doesn't agree with you.


I was so excited to make this that I didn't take step by step pictures - oops!   Here are the easy steps.

  • Crack eggs into a bowl, beat with a fork.  I added salt and pepper.  
  • Preheat a small skillet and lightly grease the pan with coconut oil.  Heat over medium heat.
  • Chop up your veggies.  I cut my carrots, broccoli and snow peas into bite size bits.
  • Add the eggs to the hot pan, let it cook for a few minutes.   
  • Add the veggies and cheese to the eggs - at this point the eggs should be set up on the bottom, but still very runny on top, so your veggies will sink down into the eggs. 
  • Let it continue to cook.   Many recipes say to put the skillet in the oven to finish cooking.  I let mine set up on the stove top, then covered the pan to cook it nearly all the way through.   Finally, I used that lid to help me flip the frittata over to finish up the last little bit of cooking.  
  • All together, this breakfast took me about 15 minutes to cook from start to finish.


I would like to make this again and use more eggs - this should be a little fluffier and fill up the pan more.   As it was, this 4 egg made a bit more than a full serving, but not quite enough to feed two (or for two meals) however, it used up the leftovers!   :)   I was able to slice it like a pizza and eat each little slice with my fingers or my a fork.   Delicious. 

Sunday, September 9, 2012

Eggs Poached in Tomatoes

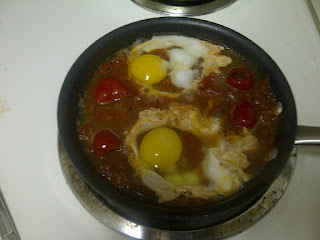
Late last week, I came across this blog post  from Mark's Daily Apple and I was intrigued!   It sounded absolutely delicious....and I had just spent the weekend canning tomatoes so I was prepared to make this recipe even easier!

It turned out delicious and couldn't have been easier!

First, prepare your tomatoes - Mark has a great method if you need to start from scratch.  I was short on time this morning so I grabbed a pint of stewed tomatoes (no additives, just tomato chunks and juice) and added some salt and pepper.   I let this simmer in my small (metal handled) saute pan.  Perfect for a healthy meal for one.  I let it simmer till the sauce had reduced by half, and kept the temperature on med, low bubbling simmer, not hard boiling.

Next, crack your eggs into a small bowl - so much easier (from everything I've read) to gently slide them into the tomatoes without breaking them apart - and slide them into opposite sides of the pan of tomatoes.   Sooo I took a picture of my eggs, and my little bowl, but forgot to take a pic of the eggs in the bowl.  Oops!


Let them simmer and begin to set up at the edges before you move the pan.   Start pre-heating the oven to 350.  It's so hard to be patient, but don't stir or move the pan at all.  
 I was having trouble being patient so I added some mild pepperdew peppers.  These are semi-sweet, semi-hot and added just the right heat.  I had 4 left...so I plopped them in to the tomatoes.

Finish up by putting this pan into the oven for about 6-8 minutes until the whites of your eggs are set.
 
Tada!   Aren't they pretty?  Ok, so not so pretty....but delicious!
 Poured into a bowl about to be devoured.  What did you have for breakfast today?


Saturday, August 18, 2012

Squash and Zucchini "noodles" with Meat Sauce

My mom used to make delicious spaghetti and meat sauce - on a day when I crave comfort foods, this is a good one - but not so good for me since I stopped eating grains. I decided that I had lots of squash and zucchini so I would make my "noodles" from these veggies.   Turned out to be SOOo delicious!

 
I used a medium size squash and zucchini, 1 tbsp of coconut oil, salt and pepper, about 1/3 pound of ground beef (grass-fed) and a jar of tomato basil simmer sauce that I canned last summer.  I canned my own tomato basil simmer sauce (from this recipe) because the sauce that is pre-made and available in the grocery almost always has added sugar and chemicals to preserve it.  This is all natural and tastes like fresh tomatoes in the summer!  When you make it yourself you can control the ingredients (no sugar!)

First, cut the zucchini and squash into  long narrow strips.  Remove the seeds before you cut them into strips to make it easier.  Drizzle with a TBSP of coconut oil and sprinkle with crushed salt and pepper. Bake on a cookie sheet (lined with foil for easy clean up) at 400 for 15 minutes, stir/flip the strips and bake for another 10 minutes. 


 While the veggies are baking, start your sauce.   In a non-stick pan, crumble up 1/3 lb ground beef.  Check out the color of this beef - fresh from the market!
 
 Brown the beef gently - cooking it through and making sure it's all broken into little bits.   Then stir in the jar of sauce - I had about 2/3 of a pint of sauce that was open...so that's how much I used!  Cover and let it simmer and thicken a bit while you finish baking your veggies.
 

Now it is time to assemble the delicious meal!  Start with the strips of squash and zucchini, top with the sauce!     Enjoy!!   It is so delicious....and very "noodle-ish" without putting grains into  your diet.


When I do this again, I need to figure out a better method for cutting my squash and zucchini - I'd like to make the strips more uniform....
Anyone have suggestions how I can make them smaller and the same size?  A tool to recommend?